Each
week one of our contributors gives you a sneak peek into their studio,
creative process or inspirations. We ask a related question of our
readers and hope you’ll leave comments! As an incentive, we offer a
prize each week to encourage you to use that keyboard and tell us what
you think. The following week a winner is chosen at random from all
eligible entries. And here are the results from last week!
Congratulations Pat Denning!
You have won a cute little pendant from swoondimples!
Contact Heather at swoondimples to claim your prize!
~~~~~~~~~~~~~~~~~~~~~~~~~~~~~~
Today we visit with Erin Prais-Hintz of Tesori Trovati.
Let’s see what treasures she has in store for us…
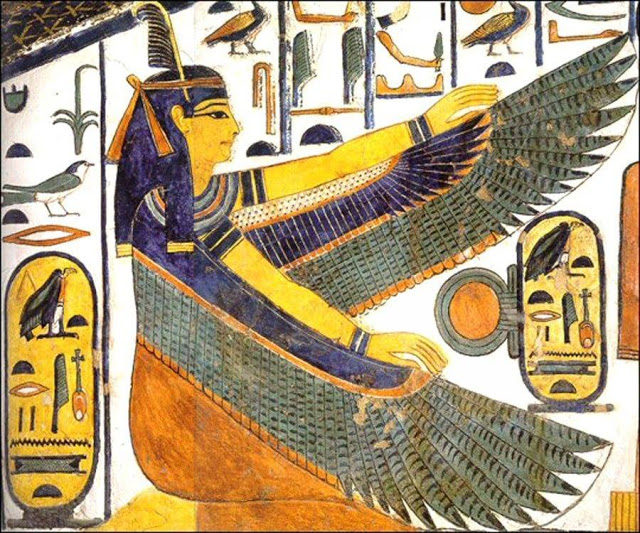
The ancient tomb of Queen Nefertari is rich with symbolism and color and is a great inspiration for October. This picture of the goddess Ma’at is part of the upper triangular shaped facing walls in the descent into the tomb. Each side of the sloped corridor are near mirror images.
As far as tombs for Queens go, Nefertari’s tomb was extra special. The statues at the opening were made to the same scale as her husband Ramsses II and she was definitely the most highly cherished of all his many wives as evidenced by her style of dress and the titles that she was given. Her tomb is also one of the finest examples of preserved Egyptian art. I was struck in reading about it that it is only available to us in virtual tours, the actual tomb having been restored several times and ultimately closed off. The wall art is spectacular, but the ravages of time (and the moistness of our breath) have irreparably crumbled some of it. Still, the colors were very bright and there was no surface left unadorned.
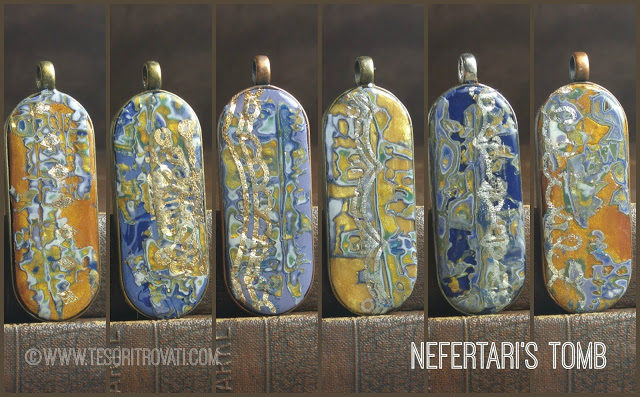
Since the walls were the most fascinating to me, and they are made from this type of sandstone that has crystal in it that would expand and crumble, I set out to recreate what I thought might be a piece of that crumbling tomb wall.
Each month for my
Simple Truths Sampler Club, I come up with a new design based on our art here. I also try to push myself and learn something new. What I decided to teach myself this month was a technique called
‘mokume gane’ (mo-KOO-may GAH-nay). This is actually an ancient Japanese technique for fusing metals and making a sort of moire pattern on decorative objects. It literally means ‘wood grain metal.’ But polymer clay artists are a clever lot, and they have transformed this technique through the great imitative qualities of polymer clay. This technique has always seemed so mysterious to me. I am very attracted to it when I see it. So that meant that I would need to do a little research in order to pull this off. I looked at some online tutorials, but ultimately came back to several books that I have on working with polymer clay, specifically,
The Complete Book of Polymer Clay by Lisa Pavelka. This is a must have book if you are interested in working with polymer clay as so much is explained in great detail.
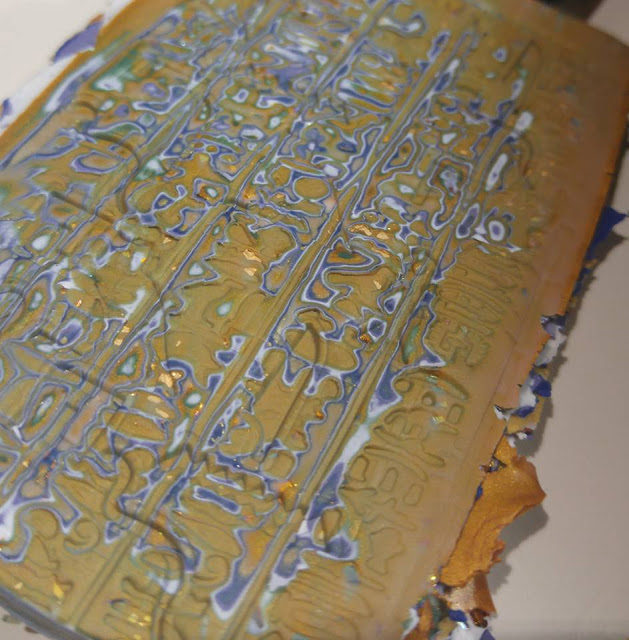
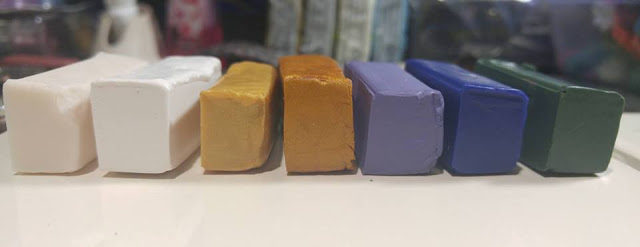
Essentially, thin sheets of clay are melded together, alternating with some translucent clay and thin sheets of metal leaf, distorted in some fashion (like by impressing a stamp into the top) and then slices are shaved off that result in the distinctive patterning. I actually took my colors from the image
palette that Heather generated and used an Egyptian hieroglyphic stamp for the distortion (although it is hard to see the actual imagery).
And it does look a lot like the Fordite that Miss Swoondimples is so in love with! Hmmmm…makes me think of some new applications for expanding this technique!
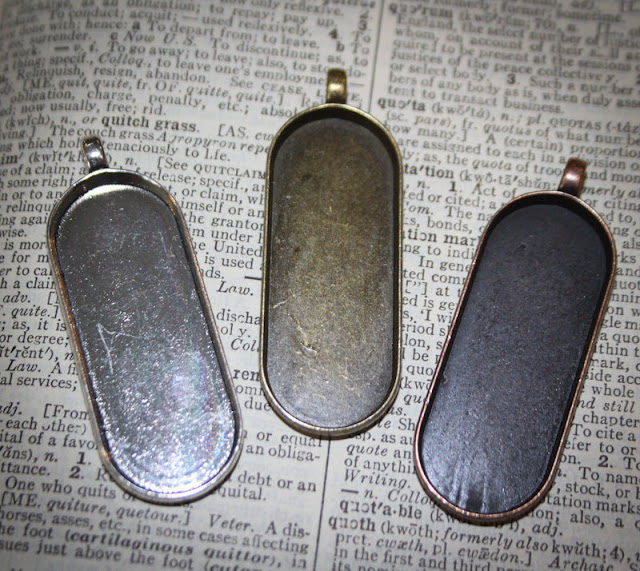
I found these great oval shaped bezels in my stash that really mimic the shape of the ancient cartouche, like you see in the image of the goddess. A cartouche is an oval with a horizontal line at one end, indicating that the text enclosed is a royal name. At one time only Pharaohs wore a cartouche as jewelry, being careful not to lose it, as they believed that whoever possessed the name had control over the person. The oval around the hieroglyphs was there to protect them from evil
spirits in life and after death. This came to symbolize good luck and protection from evil. To an
Egyptian, if you had your name recorded somewhere you did not disappear after death, so you will see these frequently inscribed on sarcophagi or on tomb walls.
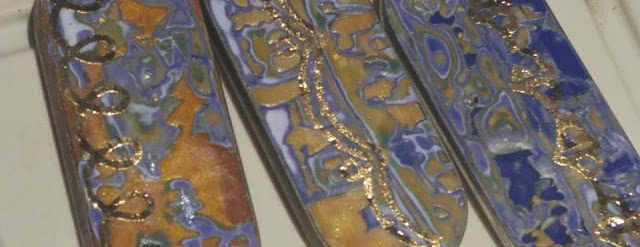
I used straight colors from the stack for the base – each one slightly different. Then I layered thin slices of the mokume gane on top, letting some of the base color show through. Since Nefertari was known as the “king’s great wife” I figured there should be touches of gold. Each pendant got a different gold touch with the application of… get ready for this… a temporary tattoo! Unfortunately, even after baking, the tattoos were a bit tacky (they are temporary, after all!). So I decided to layer a coat of UV resin on top to seal the crumbles and gold applique. A bonus of resin is that it amplifies the beauty of whatever is underneath. Plus it is rock hard!
My tribute to the “mistress of charm, sweetness and love” is what I call Nefertari’s Tomb, and they are available in my webstore. I like to think that the Queen would approve!
Would you like to win one of your very own? I would love to make one just for you! So I am giving away a $25 gift certificate to my webstore www.tesoritrovati.com (which equals the price of the pendant… or whatever else you might like 😉 for an answer to this question:
What new technique would you like to learn
AND
what action are you taking to make that happen?
Share links if you have them!




Rebecca
October 30, 2015 at 10:46 amYou are so very clever Erin!
Jess Green
October 30, 2015 at 11:20 amLovely pendants Erin – they reflect the colours and textures of the tombs so well 🙂
I really really want to try riveting – but I'm also dang scared of it! I'm not sure why! I have been sawing and fold forming for a while now and want a way of adding more dimension to my pieces, but I'm finding the whole thing a bit daunting!
However, I recently got over one of my other phobias – knotting – so maybe this one is next in line.
Kathy Lindemer
October 30, 2015 at 11:37 amI would love to be able to create polymer clay components like these. Just gorgeous! I finally took a huge step and attended a retreat/class held by Heather Powers. I learned so much. I have now signed up for an online class offered by Heather, It will allow me to learn more at my own pace. I also purchased some more tools that will help me to work on these types of projects.
Linda - Earthshine.co.uk
October 30, 2015 at 1:19 pmThey are brilliant Erin. I tried that once and it is not as easy as it looks.
Kristen
October 31, 2015 at 12:05 pmYour results are fantastic! I want to learn some different techniques in fused glass. I have been making ornaments to get more experience and I have a great book!
Sarajo Wentling
October 31, 2015 at 2:30 pmLove, love, LOVE these! I'm not sure what new technique I want to learn most/next but I want to try it all! 🙂 I've already decided that this is going to be the year I finally go to Bead and Button so I'll be looking at their class offerings to find something there. Also, I'm going to make Heather's fall retreat happen next year and that will mean playing with polymer clay for the first time. I know you guys are having a great time!
Eileen The Artful Crafter
October 31, 2015 at 5:46 pmErin, this is absolutely fascinating. I love learning about ancient Egypt and the incredible things the Egyptians created.
Your cartouches are gorgeous! I'm embarrassed to answer the question but would love to win – so here goes.
I want to be more proficient with resin. I've had more failures than successes. What am I doing to improve? Not much. I collect images and tutorials. Every once in a while, I give it another go. I need to get over my fear of resin 😉
Heather Wynn Millican
October 31, 2015 at 5:53 pmTemporary tattoos!! How clever indeed! I would love to try the UV resin so I guess the action I need to take is to get off my tush and go purchase some 🙂
Erin S
October 31, 2015 at 10:23 pmThese are super-cool, Erin. Temporary tattoos are a genius idea!
I still want to learn riveting. I even bought a tool, which of course has been languishing in a drawer forever. I also want to try some concrete work, which intrigues me with its minimalism. One day…
Karen M
November 1, 2015 at 2:04 amLampwork glass beads – I took a class last weekend!!!!
Maryellen Siegel
November 1, 2015 at 10:21 amI would like to learn bead crochet! I'm going to devote one hour each day to learning something new!
beadrecipes
November 1, 2015 at 10:23 amAfter taking a class at BeadFest, I am itching to learn more about enamelling! I am angling to get a torch for Christmas, and then I'll see about doing a Craftsy class to get a bit of confidence up with it.
Love your Nefertiti-inspired pendants, they are fabulous!
fulgorine
November 1, 2015 at 1:22 pmBeautiful pendants. I'd love to try precious metal clays, but that rabbit hole is on hold due to budget constraints.
Ann Schroeder
November 2, 2015 at 3:43 amI love these pendants and all the thought behind them. The one I got is wonderful! The gold is so great and I love how creative you are at using such unexpected things in your work! I want to start using vintage tin in my work. I have a collection of tins and recently bought a disc cutter. I also have the other materials/tools I need and tutorials. Now I just have to take time to sit down and do some work.
Carolyn
November 2, 2015 at 5:35 amLove your pendants especially those with the blue in them.
Even though I have been beading for several years, I haven't mastered the wrapped loop yet so I want to work on that. I recently bought a class at Craftsy that I think will help me.
Julie Wong Sontag
November 2, 2015 at 5:33 pmI just feel SO blown away by *everything* in this post, lovely Erin! You are truly such a gorgeous creative spirit, through and through. Thank you for sharing your process and your explorations with us – it's fascinating.
Mmmmm…. I am hoping to learn to electroform soon. I bought my whole setup nearly a year ago and I keep saying 'I'll find time soon….' Think it's probably time to make the time 😉 Thanks for the little nudge! xoxoxo — Julie
Claire Lockwood
November 7, 2015 at 3:00 pmI could never get this technique to look good- this looks fab!