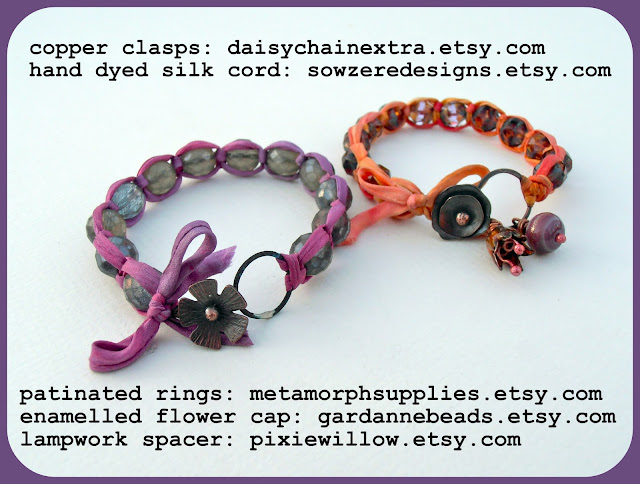
Knotting techniques and using fibre in jewellery are all the rage at the moment and you may well have used some sari silk, cord or ribbon in your jewellery. It can add a relaxed vibe; a softness and bountiful colour possibilities! It also allows a piece of jewellery to be made entirely without the use of metal, which could be important if designing for someone who has an intolerance (although I have used a copper clasp, you could easily replace this with clasp of a different material, or even a knotted closure). I have long taught knotting classes at my local bead shop, and fellow ABS editor Erin Siegel along with Lorelei Eurto have an exciting book coming out soon – Bohemian Inspired Jewelry, for which I personally can’t wait! These ladies are both so talented and I am looking forward to seeing their beautiful fibre led designs.
One of the oldest knotting techniques is macrame, originally used by sailors I believe. I thought I’d offer up a tutorial using the classic macrame knot, the square knot.
**If you are not sure about a lark’s head knot, check out my blog tomorrow**
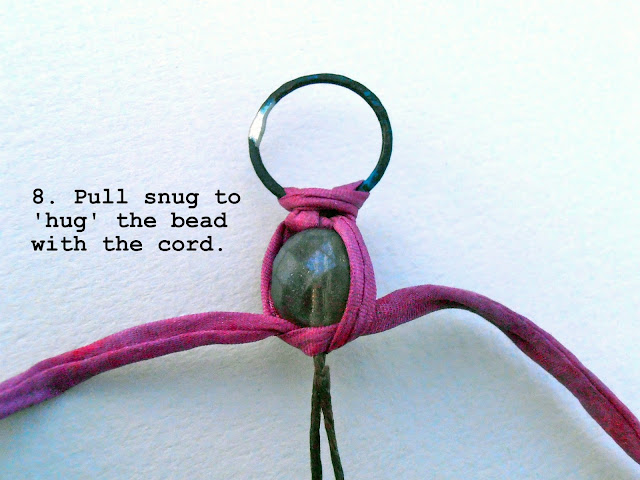
{I accidentally jumped from step 5 to step 7. There isn’t a missing step, I just left the number 6 out by mistake! Oops.}
***Can you see the cord coming over itself on the LH side, where I have drawn with green pen? This means the following half-knot must start with a LH loop. Similarly, if this bit of cord was on the R, I would begin the next knot with a RH loop. I find it useful to check this if I have to put my work down whilst knotting.***
I finish off the silk cord by tying a bow, and then double knotting it.
Have a look at some other bracelets using the same technique.
Beading by Malin de Koning
Malin has used cord to knot and shows how beads of different shapes and sizes can be combined using square knots. Check out her blog for many more square knotted pieces.
Erin Siegel
This photograph really whets my appetite for Bohemian Inspired Jewelry – just look at those beautiful colours and contrasting textures! Erin shows how even a thicker ribbon can be used for knotting.
Rebecca is a Scottish jewellery designer and singer, currently living in Manchester, England. You can read more about beads and singing at her blog, songbeads.blogspot.com and see more of her jewellery at songbead.etsy.com.


Penny
March 27, 2012 at 6:11 pmGreat tute, thanks for sharing Rebecca, I spotted Malin's bracelet and was wondering how she did it.
Carmela
March 27, 2012 at 7:31 pmThanks for this post!
pljewels.blogspot.com
belladonna2.blogspot.com
Gale
March 27, 2012 at 7:32 pmThanks for the really clear photos and instructions. I still think I'd better practice with cheap string first!
Lupe Meter
March 27, 2012 at 9:03 pmI had not thought of using dyed silk cording for a macrame piece. I love to macrame so I will definitely give this a try. Beautiful photos…just love the look of silk with beads!
steufel
March 27, 2012 at 10:01 pmThank you very much, Rebecca. I will definitely try that!
Kat
March 27, 2012 at 10:58 pmoops I commented under the wrong post, but in any event lovely bracelets great tutorial.
Malin de Koning
March 27, 2012 at 11:20 pmOh Rebecca, silk in macrame. Have never tried that. Gotta try that now. 🙂 And thanks for the feature. I used Superlon cord in that bracelet. A synthetic very thin cord, and not the easiest to work with when doing macrame to be honest, it's a bit slippery kind of, but the result looks great. Patience is a virtue as they say 🙂
Gaea
March 28, 2012 at 3:09 amSooooo COOOL! Beautiful! What a fun technique!
Cindy
March 28, 2012 at 4:33 amI loved this post, Rebecca. Thank you for the clear and concise tutorial…your projects are beautiful, especially finished off with Jo's clasps. All of the macrame examples are beautiful….and I can't wait to see Bohemian Inspired Jewelry as well!
Erin Siegel
March 28, 2012 at 3:25 pmRebecca, thank you for the mention and links to Bohemian-Inspired Jewelry! It looks has though our book jumped up on the best sellers list on Amazon.com due to your post here! Thank you so much for helping us get the word out. It's very much appreciated! I hope you will find the book inspiring when you finally receive your copy!
Jo
March 30, 2012 at 11:07 pmJust catching up with my blog reading after a busy week to find your tutorial – and my clasps on your bracelets, thank you! A great tutorial Rebecca, perfect bracelets for layering.
Beaded Bracelets
April 15, 2012 at 9:48 amThis was a great tutorial…the main feature of this bracelet s we can have endless colour options in this design….
luan
May 25, 2012 at 7:16 amYou simply created a very nice procedure. I should try making one, but at times I tend to be impatient with making crafts.
Thanks for sharing.
Audrey from gazon en rouleau
wicked jypsi
May 27, 2012 at 11:36 pmWonderful tutorial – an awesome twist on the traditional square knot bracelet! I Love it !!!
flo
June 1, 2012 at 4:28 pmcool i'm going to make this one!
Anonymous
August 19, 2012 at 5:23 amAwesome tutorial! So helpful, gonna make one right now!! Thanks, love ur stuff!!
Beaded Bracelets
August 28, 2012 at 1:24 pmOh your jewelry came out so cute! I love both pieces you created and Love your bracelet too So create some thing new and unique design in this!
Kimberly
September 6, 2012 at 2:54 amIf we have a 2 inch tail and an 8 inch tail, how do we knot the beads on for the entire length of the bracelet? The instructions look so easy to follow, am I over thinking this one step? Thanks for the GREAT TUT!
Designer Bracelets
December 11, 2012 at 8:34 amLove the bracelet; I have a ton of recycled glass beads that would work wonderfully with this style! Thank you for sharing this tutorial!